Ever wondered how to bring your simulator to life with a 6DOF motion platform? This guide will show you how to install it step-by-step. You'll learn how to unpack, assemble, and wire your platform safely. Proper installation ensures optimal performance and protects your investment. In this post, you'll discover the benefits of a well-installed 6DOF motion platform.
Unpacking and Preparing Your 6DOF Motion Platform
When your 6DOF motion platform arrives, the first step is to carefully unpack and prepare for assembly. Proper preparation ensures a smoother installation process and helps avoid damage or safety issues.
Inspecting the Delivered Components
Begin by checking every component against the packing list. Look for:
Frame parts, including legs and base plates
Motors and actuators, typically labeled for left, right, or rear positions
Bolts, nuts, washers, and other fasteners sorted in labeled bags
Electrical cables and connectors, ensuring no damage or disconnections during shipping
Control boxes preset to your country’s voltage
Additional accessories like seat mounts or controller brackets
If anything is missing or damaged, contact the supplier immediately. For DIY 6DOF motion platform builders, this step is crucial to avoid costly delays.
Organizing Tools and Workspace
Set up a clean, well-lit workspace with enough room to lay out all parts. Gather essential tools such as:
Hex wrenches and socket sets for bolts
Screwdrivers for electrical connections
Torque wrench to tighten bolts properly after assembly
Safety gloves and eye protection
Organizing your workspace reduces frustration and speeds up assembly, especially if you’re working on a DIY 6DOF motion simulator project or an Arduino 6DOF motion platform.
Safety Precautions Before Starting
Safety is paramount when assembling your 6DOF platform:
Keep children and pets away from the assembly area—motors and moving parts can be hazardous.
Avoid fully tightening bolts until the entire frame is assembled to allow adjustments.
Double-check motor and sensor cable connections; incorrect wiring can damage components.
Do not power the platform until assembly and electrical setup are complete and verified.
Plan to attach only the seat initially; add controllers and accessories after testing platform movement.
Following these precautions ensures a safe environment and protects your investment.
Tip: Always verify motor and sensor cable connections before powering your 6DOF motion platform to prevent electrical damage and ensure smooth operation.

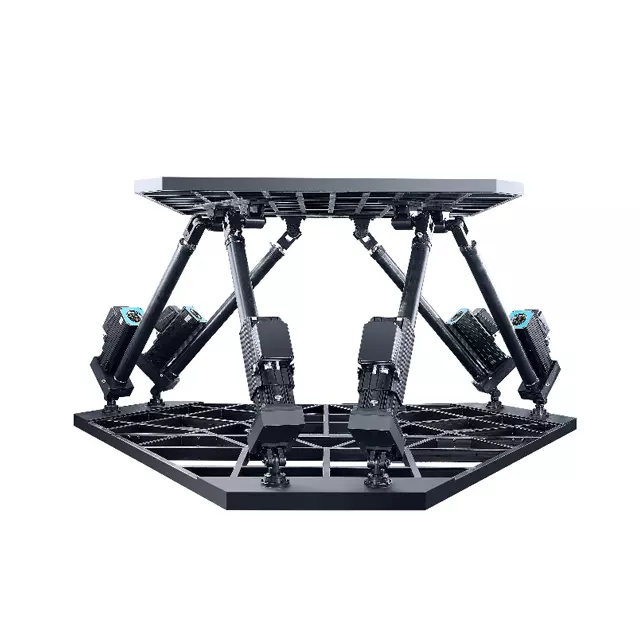
Initial Assembly Steps for the 6DOF Motion Platform
Assembling your 6DOF motion platform is an exciting step that brings your simulator closer to life. Whether you purchased a ready-made 6dof platform or are working on a diy 6dof motion platform, following these initial assembly steps carefully will ensure a solid foundation for smooth operation.
Connecting the Frame Components
Start by assembling the main frame parts. Typically, the frame includes base plates, legs, and support beams that form the hexagonal or rectangular structure of your platform. Use the provided M8x35 bolts, nuts, and washers to join these components. Keep bolts loose initially to allow fine adjustments as you proceed.
Lay out the frame parts on a flat surface to verify alignment.
Attach legs or wheels to the frame if included.
Use a square or level tool to ensure the frame is perfectly aligned before tightening bolts.
For DIY 6dof motion simulators, this step may require welding or bolting based on your design.
Mounting the Motors and Actuators
With the frame in place, mount the motors and actuators that will drive the platform’s movement. Motors are usually labeled (L for left, R for right, and numbers for rear) to match their mounting positions.
Position each motor so the logo sticker faces outward for easy identification.
Attach motors using the specified bolts, ensuring they are securely fastened but not over-tightened.
Connect the actuators or rods to the motor shafts and frame. The rods often attach to triangular mounts or adapters on the frame.
For platforms using worm gearboxes or SFU gearboxes, follow the specific instructions for mounting and connecting rods.
If you are building an arduino 6dof motion platform or a diy 6dof flight simulator, ensure your motors and actuators match your control electronics specifications.
Securing the Platform Base
The base of your 6dof platform must be stable and secure to support dynamic motion safely.
Attach base plates or footings to the frame using the longer bolts (e.g., M8x90) as indicated in your assembly guide.
If your platform includes a seat mount or controller brackets, install them now but avoid mounting any controllers until after testing.
Double-check all bolt tightness and frame alignment before proceeding.
For DIY enthusiasts, ensure your base design provides enough clearance for full actuator travel and platform movement.
Note: Avoid fully tightening bolts during initial assembly; leave room for adjustment until the entire platform is assembled and aligned.
Tip: Label each motor and actuator during mounting to simplify wiring and troubleshooting later, especially important for complex 6dof motion platform diy projects.
Wiring and Electrical Setup
Setting up the wiring and electrical connections is a crucial step in installing your 6DOF motion platform. Proper wiring ensures safe operation and reliable motion performance, especially for complex systems like a 6dof motion simulator diy or an arduino 6dof motion platform.
Connecting Power and Sensor Cables
Start by connecting the power cables from the control boxes to the motors and actuators. Each motor typically has a dedicated power cable, often color-coded or labeled to match its position (left, right, or rear). Similarly, sensor cables that provide feedback on motor position and movement must be connected carefully.
Match each motor’s power plug to the corresponding control box port.
Connect sensor cables to their designated ports, ensuring no cables are swapped.
Avoid forcing connectors; they should fit snugly without damage.
Use cable ties or clips to organize wiring neatly and prevent tangling during platform movement.
For DIY 6DOF motion platform builders, double-checking these connections is vital to avoid electrical faults.
Ensuring Correct Voltage Settings
Before powering up, verify that the voltage settings on your control boxes match your local power supply. Many 6dof platforms come with preset voltage configurations, but it’s important to confirm:
Locate the voltage selector switches inside the control box, usually marked with red switches.
Confirm the switches correspond to your country’s voltage (e.g., 110V or 220V).
If uncertain, consult your platform’s manual or contact the supplier.
Never attempt to change wiring colors or connections to alter voltage; this can cause permanent damage.
This step is especially important if you purchased a 6dof motion platform price-sensitive option or a DIY kit shipped internationally.
Testing Electrical Connections
Once all cables are connected and voltage settings verified, proceed to test the electrical system without load:
Power on the control boxes and check for indicator lights or status LEDs.
Use a multimeter to verify voltage at motor connectors if you have one.
Run initial motor tests through the control software or manual controls to confirm proper response.
Listen for unusual noises or check for overheating immediately.
If any motor does not respond or behaves erratically, power down and recheck wiring.
For DIY 6dof flight simulator enthusiasts, this testing phase helps catch issues before full assembly, saving time and preventing damage.
Tip: Label each power and sensor cable during connection to simplify troubleshooting and future maintenance of your 6DOF motion platform.
Finalizing the Structure and Testing Movement
Once you have your 6DOF motion platform frame assembled and wired, it’s time to finalize the structure and conduct initial movement tests. This step is crucial to ensure everything operates smoothly before adding controllers or extra accessories.
Attaching the Seat and Controllers
Start by securely attaching the seat to the platform. Most 6DOF platforms come with a dedicated seat mount or bracket designed to fit the frame perfectly. Use the longer bolts provided (often M8x90) to fasten the seat bars from the bottom up, ensuring a stable and safe seating position.
Attach the seat back bar first, then the front seat bar.
If your platform includes a wheel holder, shifter mount, or pedal plate, install these components now using the specified bolts.
Avoid mounting any electronic controllers (wheel, pedals, HOTAS) at this stage. Doing so can affect the platform’s balance and make troubleshooting harder.
For DIY 6DOF motion platform builders or those working on an Arduino 6DOF motion platform, this step helps simulate the actual user weight distribution, which is critical for balancing.
Balancing the Platform
Balancing your 6DOF platform ensures that the motors and actuators operate within optimal load ranges and prevents premature wear or overheating.
Check that the platform rests evenly on all six actuators without excessive sagging or uneven tension.
Adjust the rod lengths or mounting points slightly if needed to achieve a neutral, balanced position.
The seat and any mounted accessories should be centered as much as possible on the platform’s top frame.
For DIY 6DOF flight simulator projects, consider the placement of additional equipment carefully to maintain balance.
Proper balancing reduces strain on motors and improves the realism of motion feedback.
Performing Initial Movement Tests
Before adding controllers or extra gear, test the platform’s movement through its full range of motion.
Power on the system and use the motion control software to run basic movement commands.
Observe the platform as it moves through pitch, roll, yaw, surge, sway, and heave motions.
Listen for unusual noises such as grinding or excessive motor strain.
Check for smooth and consistent motion without jerks or stalls.
If possible, perform these tests with a person seated to simulate real-world conditions.
If any issues arise, power down and inspect the mechanical connections, bolts, and wiring. Make adjustments as necessary before proceeding.
Tip: When finalizing your 6DOF motion platform, always attach only the seat initially and avoid mounting controllers until after successful movement tests to ensure proper balance and prevent damage.
Software Installation and Configuration
After successfully assembling and testing the mechanical and electrical components of your 6DOF motion platform, the next critical step is software installation and configuration. This phase brings your platform to life by enabling precise motion control and integration with simulation software.
Installing Motion Control Software
Begin by installing the dedicated motion control software provided by your platform manufacturer or chosen third-party software compatible with 6DOF platforms. Popular options include Sim Racing Studio, SimTools, or custom Arduino-based solutions for DIY 6DOF motion platforms.
Close all other motion-related software before installation to prevent conflicts.
Download the latest version from the official website or trusted source.
Follow on-screen instructions carefully, selecting the correct platform model (e.g., H6, P6, or a custom 6dof motion platform diy build).
Activate your software license if required, ensuring full access to all features.
For users working on an Arduino 6DOF motion platform or a DIY 6DOF flight simulator, ensure your firmware matches the software version to maintain compatibility.
Calibrating the Platform
Calibration aligns the software’s commands with the physical movements of your platform. Proper calibration is essential to achieve realistic and smooth motion.
Connect your 6DOF platform to the PC via USB or Ethernet as specified by your control box.
Launch the motion control software and navigate to the calibration section.
Follow the step-by-step calibration wizard, which typically involves:
Setting zero positions for each actuator.
Defining travel limits to prevent mechanical overextension.
Adjusting sensor feedback to correct any offsets.
Perform test movements through the software interface, observing the platform’s response.
Fine-tune parameters like motor speed, acceleration, and damping to suit your preferences.
DIY enthusiasts should pay close attention to sensor alignment and signal integrity during calibration, as these factors significantly impact performance.
Integrating with Simulation Software
To enjoy immersive experiences, your 6DOF motion platform must communicate seamlessly with simulation games or training applications.
Install any necessary plugins or drivers for your simulation software to recognize the motion platform.
Configure the motion control software to receive telemetry data from the simulation game.
Test the integration by launching a supported game and verifying that the platform responds to in-game events such as acceleration, braking, and turns.
Adjust motion profiles within the control software to tailor the intensity and responsiveness of movements.
For those exploring the 6dof motion simulator diy route, integration may require custom scripting or middleware to bridge hardware and software effectively.
Tip: Always update your motion control software and firmware to the latest versions to ensure compatibility, improved features, and enhanced stability for your 6DOF motion platform.
Troubleshooting Common Issues
When operating your 6DOF motion platform, encountering some common issues is normal, especially in the early stages after installation. Knowing how to address motor overheating, fix connection problems, and resolve calibration errors will save you time and protect your investment, whether you have a commercial 6dof platform or a diy 6dof motion platform.
Addressing Motor Overheating
Motors on a 6DOF motion platform can overheat if they operate under excessive load or if ventilation is insufficient. Overheating can reduce motor lifespan and cause performance degradation.
Monitor temperature: Use a thermal sensor or touch test during initial runs. Motors should not exceed 70°C (158°F).
Ensure proper ventilation: Keep the platform in a well-ventilated area. Avoid enclosing the motors in tight spaces.
Check for mechanical binding: Inspect rods and joints for tight spots or misalignment causing extra strain.
Balance the platform: An unbalanced platform puts uneven load on motors, increasing heat buildup. Adjust rod lengths or seat placement as needed.
Limit continuous operation: Avoid leaving the platform powered on and idle for long periods since motors perform micro-adjustments that generate heat.
If overheating persists, consider upgrading to motors with higher torque or adding cooling fans.
Fixing Connection Problems
Electrical connections are vital for reliable platform operation. Common issues include loose plugs, incorrect wiring, or damaged cables.
Verify cable connections: Check that all motor power and sensor cables are firmly plugged into their correct ports. The control boxes are usually labeled for left and right motors.
Avoid mixing cables: Never swap sensor or power cables between motors; this can cause damage.
Inspect cables for damage: Look for frayed wires or bent pins that may cause intermittent connections. Replace damaged cables promptly.
Secure cables: Use cable ties to prevent movement and accidental unplugging during platform motion.
Test with multimeter: If you suspect a connection issue, measure continuity and voltage to confirm proper wiring.
For DIY 6dof motion simulators or Arduino 6dof motion platforms, labeling cables during assembly simplifies troubleshooting later.
Resolving Calibration Errors
Calibration ensures the software accurately controls the physical movements of your 6DOF platform. Errors here can cause jerky or incorrect motion.
Follow the calibration wizard: Use the motion control software’s step-by-step calibration process to set zero positions and travel limits for each actuator.
Check sensor alignment: Position sensors must be installed correctly, often at 180 degrees, to provide accurate feedback. Misaligned sensors cause incorrect readings.
Recalibrate after adjustments: Any mechanical changes, like rebalancing or adding accessories, require recalibration.
Adjust software parameters: Fine-tune motor speed, acceleration, and damping settings to smooth motion and reduce jitter.
Test with known inputs: Run basic movement commands to verify the platform responds as expected.
DIY 6dof flight simulator builders should pay special attention to sensor wiring and signal quality during calibration.
Tip: Regularly monitor motor temperatures and perform calibration checks after any mechanical changes to maintain optimal performance and prevent damage to your 6DOF motion platform.
Conclusion
Installing a 6DOF motion platform involves careful unpacking, assembly, wiring, and testing to ensure optimal performance. Key steps include inspecting components, organizing tools, and following safety precautions. For optimal performance, verify cable connections and calibrate the platform accurately. FDR offers high-quality motion platforms that enhance simulation experiences with seamless integration and reliable operation. Their products provide value through innovative design and robust construction. If you need further assistance, FDR's expert support team is ready to help with any installation queries.
FAQ
Q: What should I do if components are missing from my 6DOF motion platform delivery?
A: If components are missing from your 6DOF motion platform delivery, contact the supplier immediately to report the issue and request replacements. This is crucial for both ready-made and DIY 6DOF motion platform kits to avoid costly delays in assembly.
Q: How do I ensure the correct voltage settings for my 6DOF motion platform?
A: Verify the voltage settings on your control boxes match your local power supply before powering up your 6DOF motion platform. Check the voltage selector switches inside the control box, usually marked with red switches, to ensure they correspond to your country’s voltage.
Q: What tools are essential for assembling a DIY 6DOF motion platform?
A: Essential tools for assembling a DIY 6DOF motion platform include hex wrenches, socket sets, screwdrivers, a torque wrench, safety gloves, and eye protection. Organizing these tools in a clean workspace speeds up the assembly process.
Q: How can I troubleshoot motor overheating on my 6DOF motion platform?
A: To troubleshoot motor overheating on your 6DOF motion platform, monitor temperature, ensure proper ventilation, check for mechanical binding, balance the platform, and limit continuous operation. Consider upgrading motors or adding cooling fans if overheating persists.
Q: What software is recommended for a DIY 6DOF flight simulator?
A: For a DIY 6DOF flight simulator, popular motion control software options include Sim Racing Studio, SimTools, or custom Arduino-based solutions. Ensure your firmware matches the software version for compatibility.


